
Learn how to build and integrate powerful Smart Building and BMS projects, Access hardware documentation, feature support, tutorials, and more. Created by multi-BCIA Award-winners.
Categories
HowTo: Niagara 4 Alarm notifications in Microsoft Teams
The software allows Niagara Alarm notifications to be sent to a Microsoft Teams Channel.
Requirements
It is assumed that the user is trained in the use of Niagara 4.
The ossTeamsTools software is only compatible with Niagara versions 4.8 or later.
You must read the End User License Agreement before using this software.
It is assumed that the user has access to a Microsoft Teams Channel, and sufficient rights to create webhooks.
Installation
First install the ossTeamsTools software modules and ensure you have a valid license from One Sight Solutions installed.
Please contact One Sight Solutions <sales@onesight.solutions> to obtain the software or a license.
ossTeamsTools Operation
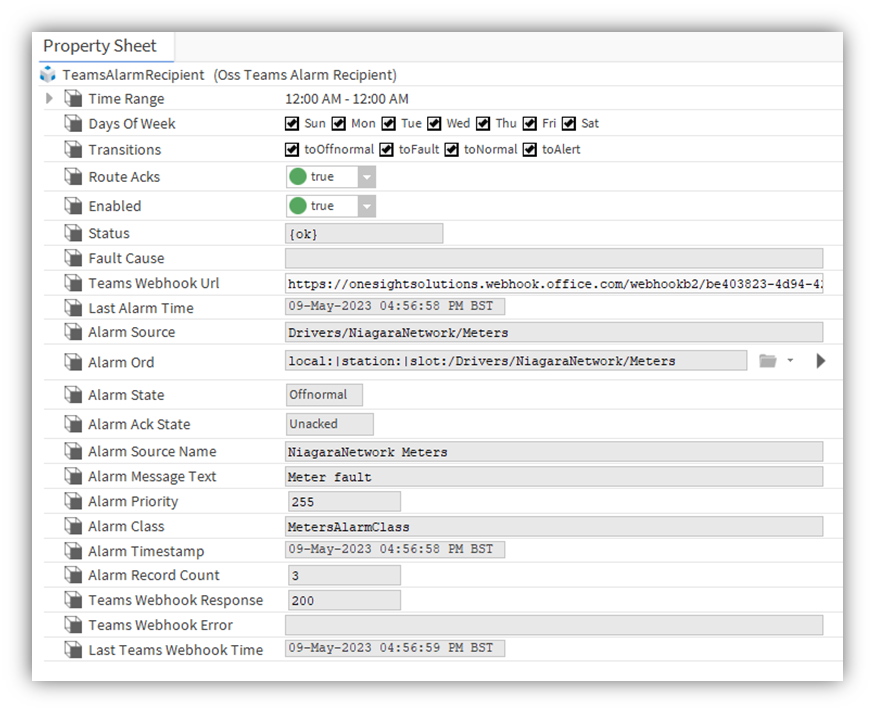
The ossTeamsTools palette has a single component, as shown in Figure 1.

The TeamsAlarmRecipient component should be placed in the Alarm Services folder, along with the associated alarm classes.
The required alarm classes should be linked to the ‘Route Alarm’ action in the same way as standard Niagara alarm recipients, as shown in Figure 2.

The only property that needs to be setup in the TeamsAlarmRecipient is the Teams Webhook URL.
How to get this URL is described below.
Setting Up The Teams Webhook with Power Automate Workflows.
To set up the Microsoft Teams Webhook you must first find or create the Teams Channel where you wish the Niagara alarm alerts to appear. Then select the menu for that channel by clicking on the three dots to the right that appear when you hover over the heading, as shown in Figure 3.
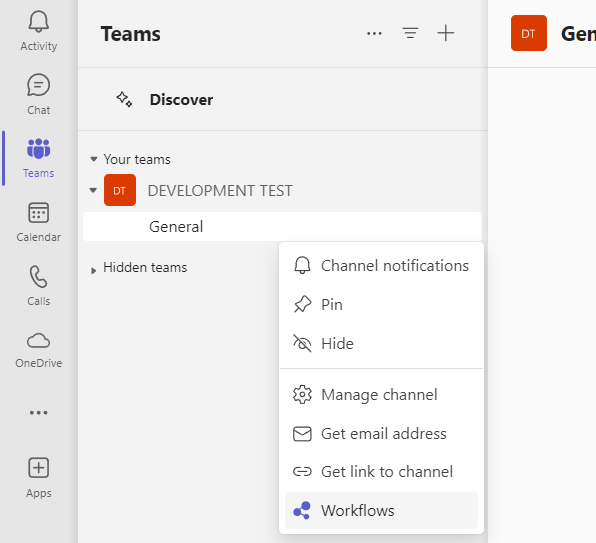
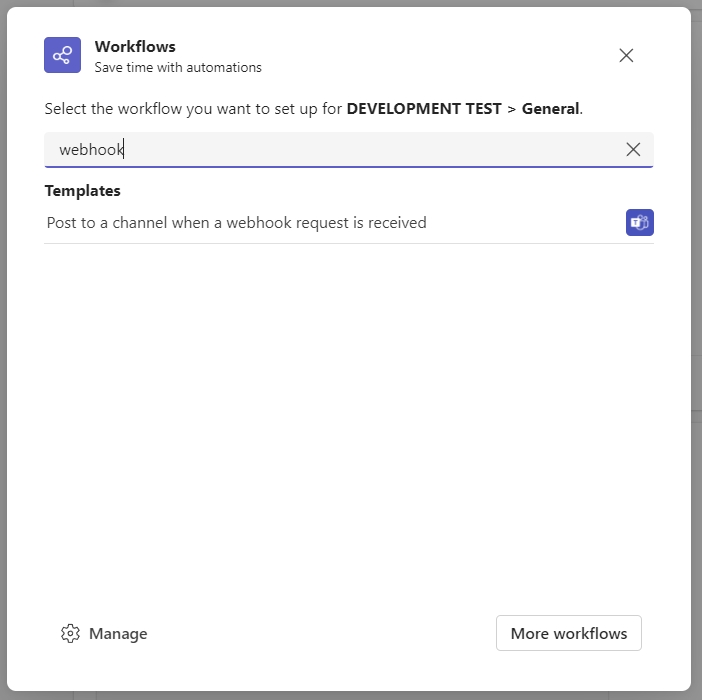
Click on the ‘Workflows’ option and a new window should appear with a list of workflow templates. OssTeamsTools requires a webhook – search ‘webhook’ in the search bar, and select the ‘Post to a channel when a webhook request is received’ template.
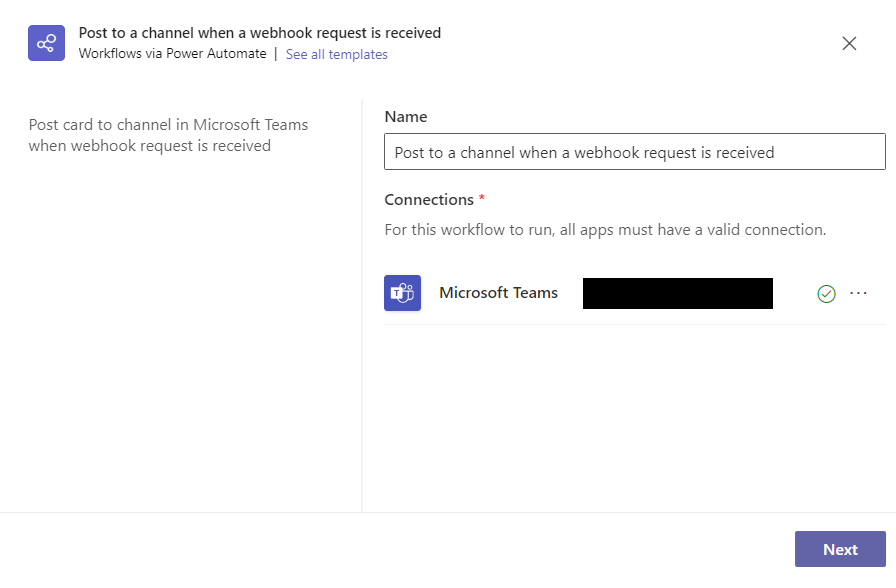
Wait while Teams verifies the workflow connection is valid, then press next once a green tick appears.
Once the Details panel appears (which may take a moment), confirm that both the Team and Channel are correct. Then ‘Add workflow’.
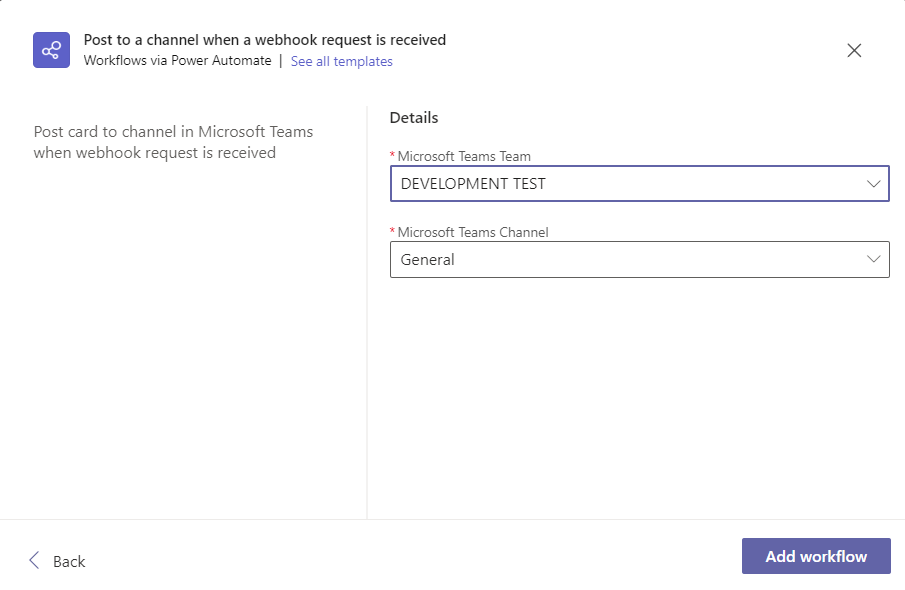
The webhook URL should appear in the box at the bottom of the view.
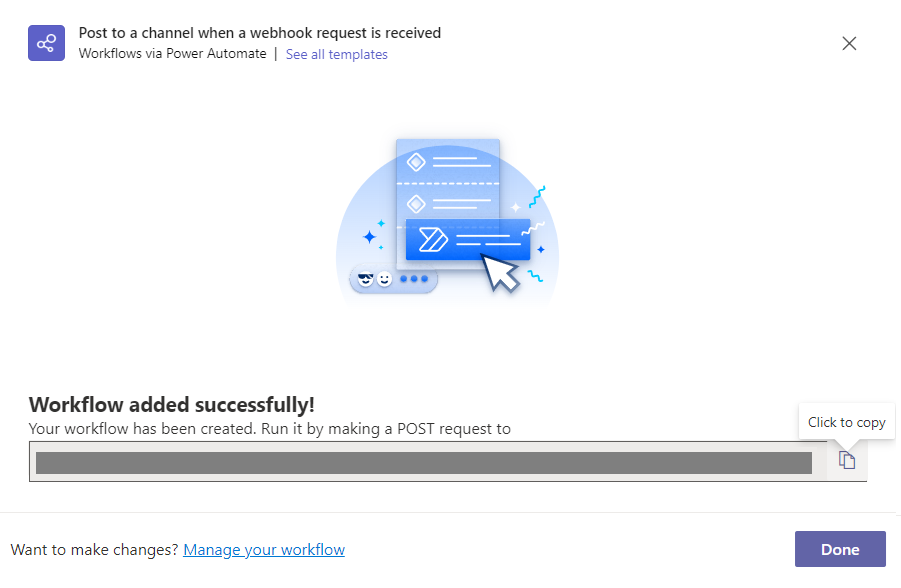
Copy the new webhook URL and paste it into the TeamsAlarmRecipient ‘Teams Webhook Url’ property.
Setting Up The Teams Webhook with Connectors
Microsoft Teams connectors are being retired by Microsoft by December 2024. We strongly recommend using the Power Automate Workflows.
To set up the Microsoft Teams Webhook you must first find or create the Teams Channel where you wish the Niagara alarm alerts to appear. Then select the menu for that channel by clicking on the three dots to the right that appear when you hover over the heading, as shown in Figure 3.
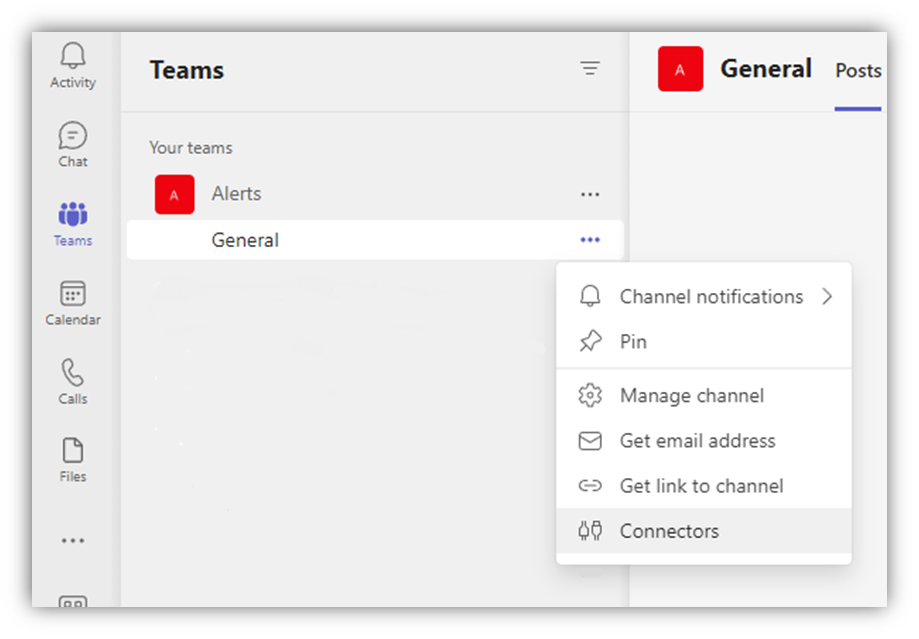
Click on the ‘Connectors’ option and a new window should appear with a list of connectors.
If you are using “new” Teams, instead select “Manage channel” to open the channel settings, then expand the “Connectors” submenu and select “Edit”.
Find the ‘Incoming Webhook’ item, (clicking on the ‘Developer Tools’ left-hand list may reduce the options to make it easier).
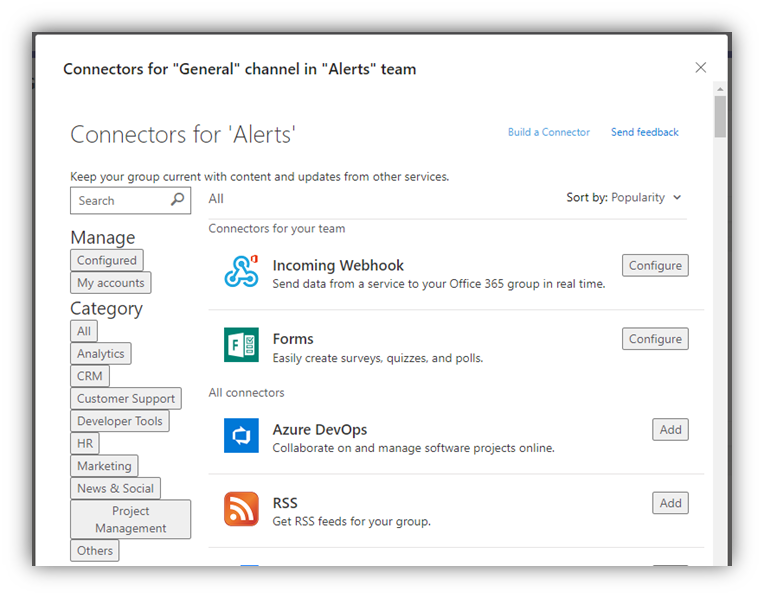
Then click on the ‘Configure’ button for the webhook item and a new window should appear.
In this new window enter a webhook name and optionally provide an icon (that will appear alongside the teams alert messages), then click the create button.

After a while a link box will be created with a copy button.
Copy the new webhook URL and paste it into the TeamsAlarmRecipient ‘Teams Webhook Url’ property.
Completing Setup
You can then click the done button to close the webhook window.
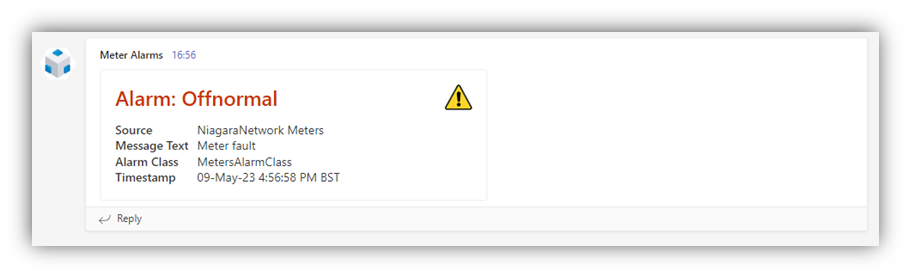
Once the webhook URL has been set up and the recipient is linked to the appropriate classes then alarm events will cause messages to appear on the selected Teams channel.


Popular Support Guides

Popular Support Videos on One SightTV


Tridium Niagara 4 Video Training


Access the Industry’s Best Technical Support
Unlock Exclusive Benefits with our Niagara Partner Program including Priority Tech Support
![]()
![]() Priority Technical Support with the Diamond Tier of our Partner Program
Priority Technical Support with the Diamond Tier of our Partner Program
![]()
![]() The widest range of Niagara Portability Products on the market, all in one place
The widest range of Niagara Portability Products on the market, all in one place
![]()
![]() Up to 5x Free Training Days for your organisation from our multi-award winning course offerings
Up to 5x Free Training Days for your organisation from our multi-award winning course offerings
![]()
![]() Unlimited access to all of our OSS Niagara 4 Drivers for Project use with our Diamond Tier
Unlimited access to all of our OSS Niagara 4 Drivers for Project use with our Diamond Tier


 Supercharge your Niagara 4 Projects with OSS Drivers
Access all 11x of our OSS Niagara 4 Drivers for Free on your Demo Station
![]()
![]() ossEasyAPI: Integrate unlimited API’s into Niagara 4
ossEasyAPI: Integrate unlimited API’s into Niagara 4
![]()
![]() ossEasyHistoryExport: Quickly export your Niagara 4 meter data into a CSV
ossEasyHistoryExport: Quickly export your Niagara 4 meter data into a CSV
![]()
![]() ossFTP: Push files or folders from Niagara to a FTP/SFTP server
ossFTP: Push files or folders from Niagara to a FTP/SFTP server
![]()
![]() ossStationBackup: Automate scheduled backups of your Niagara Supervisor station
ossStationBackup: Automate scheduled backups of your Niagara Supervisor station
![]()
![]() ossEasyMQTT: Interface with any MQTT Broker with no point limitations
ossEasyMQTT: Interface with any MQTT Broker with no point limitations
![]()
![]() ossRestAPIServer: Provides a HTTP REST API Server running on Niagara 4
ossRestAPIServer: Provides a HTTP REST API Server running on Niagara 4
![]()
![]() ossChirpManager: Seamless integration between a Chirpstack and Niagara system
ossChirpManager: Seamless integration between a Chirpstack and Niagara system
![]()
![]() ossBatchFacets: Easily search, filter and multi-select points for bulk facet changes
ossBatchFacets: Easily search, filter and multi-select points for bulk facet changes
![]()
![]() ossTeltonikaSMS: Receive SMS Niagara alarms via a Teltonika router
ossTeltonikaSMS: Receive SMS Niagara alarms via a Teltonika router
![]()
![]() ossWebhook: Configure unlimited webhook points that receive data from parties
ossWebhook: Configure unlimited webhook points that receive data from parties
![]()
![]() ossTeamsTools: Push your Niagara alarms to any Microsoft Teams channel
ossTeamsTools: Push your Niagara alarms to any Microsoft Teams channel

Niagara BMS Graphics made Easy with ossGraphicsLibrary
1857 High Quality BMS SVG’s, with seamless drag-n-drop Design for Rapid Configuration
![]()
![]() 1857 Universal SVG Assets: State-of-the-art, cross-compatible assets delivering consistant quality at any scale
1857 Universal SVG Assets: State-of-the-art, cross-compatible assets delivering consistant quality at any scale
![]()
![]() 240+ Animated Assets: Including motion sequences and dynamic real-time data responses
240+ Animated Assets: Including motion sequences and dynamic real-time data responses
![]()
![]() Building with Ease: Simple drag-n-drop elements, with seamless snap building and alignment across all assets
Building with Ease: Simple drag-n-drop elements, with seamless snap building and alignment across all assets
![]()
![]() Pre-configured Templates: Over 125 pre-made and configurable templates, saving you up to 25% engineering time
Pre-configured Templates: Over 125 pre-made and configurable templates, saving you up to 25% engineering time
![]()
![]() Flexible Licensing: Available to purchase and license per device, or supervisor, giving you bespoke scalability
Flexible Licensing: Available to purchase and license per device, or supervisor, giving you bespoke scalability
![]()
![]() Compatible with any Niagara-based System: Including Tridium, Trend, Honeywell, CentraLine, Distech, & Johnson
Compatible with any Niagara-based System: Including Tridium, Trend, Honeywell, CentraLine, Distech, & Johnson
![]()
![]() Standardised & Exquisite UI: Delivering a standardised visual across all pages, easily accessible to users & clients
Standardised & Exquisite UI: Delivering a standardised visual across all pages, easily accessible to users & clients
Explore the full range of Assets and Watch the Video