
Learn how to build and integrate powerful Smart Building and BMS projects, Access hardware documentation, feature support, tutorials, and more. Created by multi-BCIA Award-winners.
Categories
HowTo: Generate a Platform Reset Token for Tridium JACE
Jace 8000’s implement security features that prevent unauthorised access to the Platform and Station. The platform is protected to prevent malicious and unwanted access to the Station it is hosting which means if the credentials are not known or lost etc then there is limited access options available to the end user/engineer. This can occur when a site is taken over or falls under a new maintainer. The only way to securely access the platform is to obtain a platform reset token in return for a key.
If you are not the original installer or owner of the Jace will need to be authorised to obtain a platform reset by submitting a proof of ownership to your Tridium distributor prior to requesting a reset token.
If you are the original installer or owner of the controller then you will not need to prove ownership as the licence will have been issued to you.
All you will need is a Micro USB cable to hand and a Terminal emulator program like PuTTY installed on your PC. Having internet access on the PC you are using will greatly aid this process.
1. Connect the Micro USB cable to the Jace and the PC. Then open the Device Manager in Windows and expand the Com & LPT View then you should expect to see “USB Serial Port (COMxx)”. This is the Jace’s assigned com port that you will use to connect to. Open your terminal emulation software on your PC (For this guide we will refer to the use of PuTTY).
To open the Serial connection to the Jace follow the below:
a) Open Putty, then select, Connection, Serial
b) Configure the serial line with the following settings:
- Serial Line: COM xx (as stated in Device Manager)
- Speed (baud): 115200
- Data bits: 8
- Stop bits: 1
- Parity: None
- Flow control: None
c) In the PuTTY Configuration dialog, click on “Session” and select “Serial” as the “Connection type”.
d) At the login prompt, enter your platform username, and at the password prompt, enter your platform password.
e) From the main menu select option 11 to reboot the device.

f) Watch the output as the device boots and look for the prompt “Press ESC to choose alternate boot options” action this when visible.
g) You will now see the Boot Option Menu where you will want to select option 8 for Reset Platform Credentials. Select Y for yes and hit enter. This will begin the boot to Platform Access Recovery menu. There you will see the Token that will need to be exchanged along with the Host ID to your Tridium distributor. See example below and follow step 2 carefully.
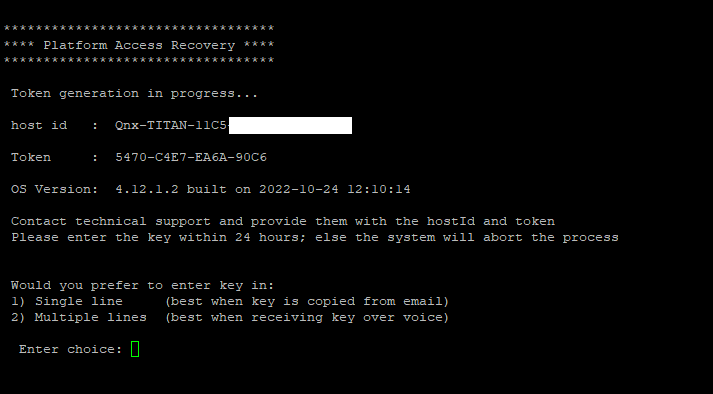
2. Note at this point you will need to stay connected to the controller while completing this process.
a) Copy the information out of the terminal and compile it into an email to your Tridium distributor request a reset token.
c) You should receive a reset token fairly promptly as the token is time sensitive. Once received your code return to the terminal window and select the appropriate key entry option.
d) Once this has been entered you will need to reconnect to the platform using workbench where you will need to enter the default credentials (tridium, niagara). Upon connection you will be prompted to change the default platform credentials.


Popular Support Guides

Popular Support Videos on One SightTV


Tridium Niagara 4 Video Training


Access the Industry’s Best Technical Support
Unlock Exclusive Benefits with our Niagara Partner Program including Priority Tech Support
![]()
![]() Priority Technical Support with the Diamond Tier of our Partner Program
Priority Technical Support with the Diamond Tier of our Partner Program
![]()
![]() The widest range of Niagara Portability Products on the market, all in one place
The widest range of Niagara Portability Products on the market, all in one place
![]()
![]() Up to 5x Free Training Days for your organisation from our multi-award winning course offerings
Up to 5x Free Training Days for your organisation from our multi-award winning course offerings
![]()
![]() Unlimited access to all of our OSS Niagara 4 Drivers for Project use with our Diamond Tier
Unlimited access to all of our OSS Niagara 4 Drivers for Project use with our Diamond Tier


 Supercharge your Niagara 4 Projects with OSS Drivers
Access all 11x of our OSS Niagara 4 Drivers for Free on your Demo Station
![]()
![]() ossEasyAPI: Integrate unlimited API’s into Niagara 4
ossEasyAPI: Integrate unlimited API’s into Niagara 4
![]()
![]() ossEasyHistoryExport: Quickly export your Niagara 4 meter data into a CSV
ossEasyHistoryExport: Quickly export your Niagara 4 meter data into a CSV
![]()
![]() ossFTP: Push files or folders from Niagara to a FTP/SFTP server
ossFTP: Push files or folders from Niagara to a FTP/SFTP server
![]()
![]() ossStationBackup: Automate scheduled backups of your Niagara Supervisor station
ossStationBackup: Automate scheduled backups of your Niagara Supervisor station
![]()
![]() ossEasyMQTT: Interface with any MQTT Broker with no point limitations
ossEasyMQTT: Interface with any MQTT Broker with no point limitations
![]()
![]() ossRestAPIServer: Provides a HTTP REST API Server running on Niagara 4
ossRestAPIServer: Provides a HTTP REST API Server running on Niagara 4
![]()
![]() ossChirpManager: Seamless integration between a Chirpstack and Niagara system
ossChirpManager: Seamless integration between a Chirpstack and Niagara system
![]()
![]() ossBatchFacets: Easily search, filter and multi-select points for bulk facet changes
ossBatchFacets: Easily search, filter and multi-select points for bulk facet changes
![]()
![]() ossTeltonikaSMS: Receive SMS Niagara alarms via a Teltonika router
ossTeltonikaSMS: Receive SMS Niagara alarms via a Teltonika router
![]()
![]() ossWebhook: Configure unlimited webhook points that receive data from parties
ossWebhook: Configure unlimited webhook points that receive data from parties
![]()
![]() ossTeamsTools: Push your Niagara alarms to any Microsoft Teams channel
ossTeamsTools: Push your Niagara alarms to any Microsoft Teams channel

Niagara BMS Graphics made Easy with ossGraphicsLibrary
1857 High Quality BMS SVG’s, with seamless drag-n-drop Design for Rapid Configuration
![]()
![]() 1857 Universal SVG Assets: State-of-the-art, cross-compatible assets delivering consistant quality at any scale
1857 Universal SVG Assets: State-of-the-art, cross-compatible assets delivering consistant quality at any scale
![]()
![]() 240+ Animated Assets: Including motion sequences and dynamic real-time data responses
240+ Animated Assets: Including motion sequences and dynamic real-time data responses
![]()
![]() Building with Ease: Simple drag-n-drop elements, with seamless snap building and alignment across all assets
Building with Ease: Simple drag-n-drop elements, with seamless snap building and alignment across all assets
![]()
![]() Pre-configured Templates: Over 125 pre-made and configurable templates, saving you up to 25% engineering time
Pre-configured Templates: Over 125 pre-made and configurable templates, saving you up to 25% engineering time
![]()
![]() Flexible Licensing: Available to purchase and license per device, or supervisor, giving you bespoke scalability
Flexible Licensing: Available to purchase and license per device, or supervisor, giving you bespoke scalability
![]()
![]() Compatible with any Niagara-based System: Including Tridium, Trend, Honeywell, CentraLine, Distech, & Johnson
Compatible with any Niagara-based System: Including Tridium, Trend, Honeywell, CentraLine, Distech, & Johnson
![]()
![]() Standardised & Exquisite UI: Delivering a standardised visual across all pages, easily accessible to users & clients
Standardised & Exquisite UI: Delivering a standardised visual across all pages, easily accessible to users & clients
Explore the full range of Assets and Watch the Video